


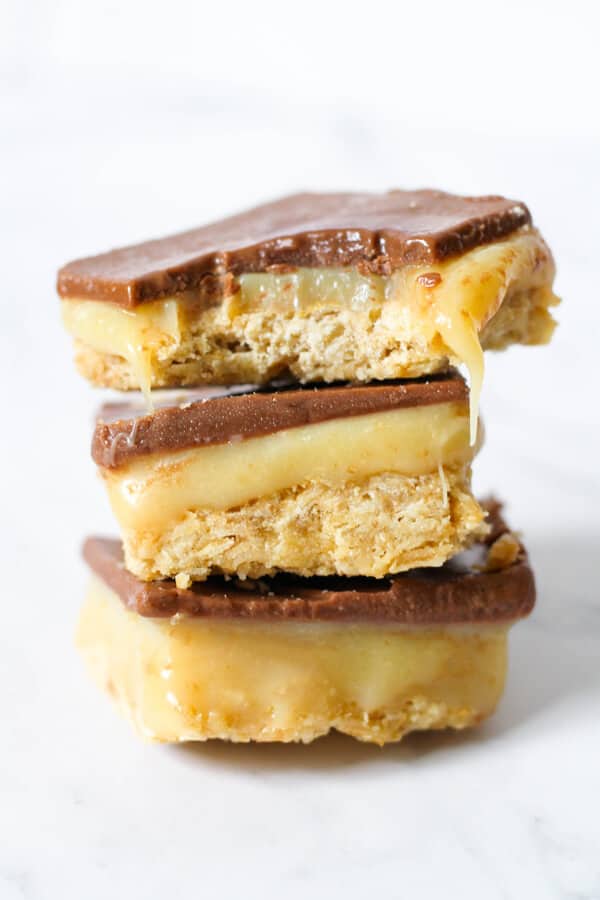
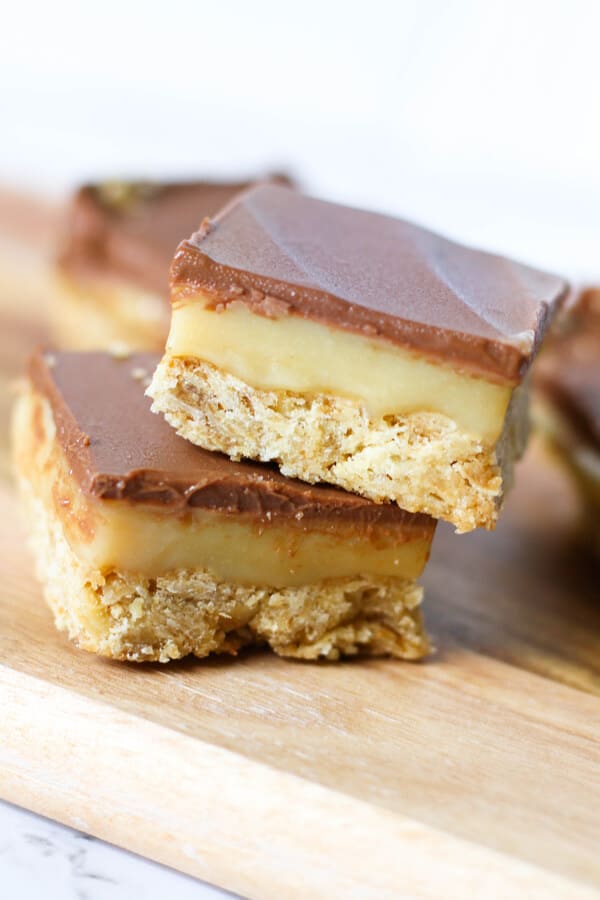
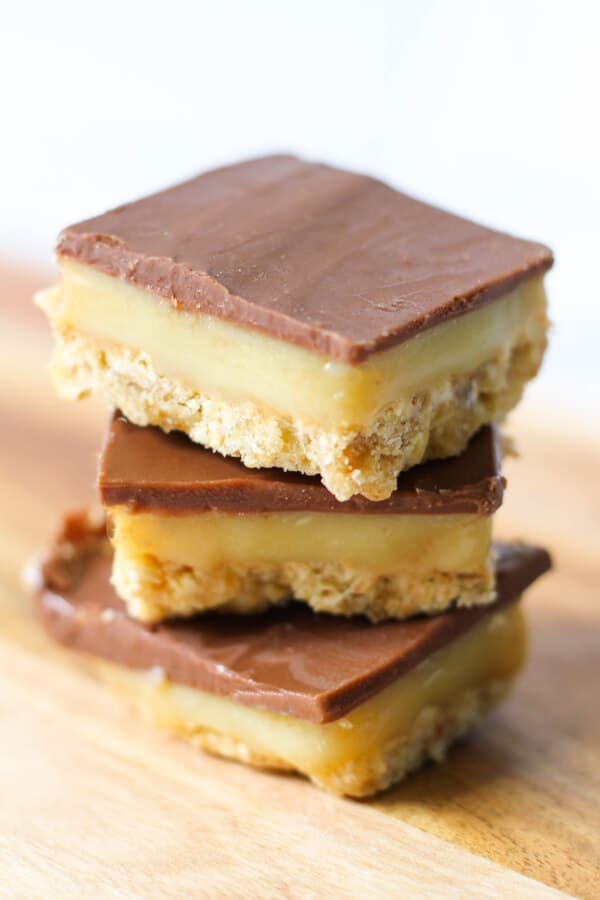
It doesn't matter if you call it caramel slice, millionaires shortbread or chocolate caramel slice - this recipe right here is the best you'll ever eat. With a delicious soft caramel centre sandwiched between an Anzac biscuit base and rich chocolate topping, you'll find it hard to stop at just one piece. You'll want to make this Anzac Caramel Slice recipe again and again.
I don't think I've ever seen a baked treat go by so many names as the humble Caramel Slice. Here's just a few names that it's also known as:
- Caramel Shortbread
- Caramel Shortcake
- Caramel Squares
- Caramel Slice
- Millionaire's Shortbread
- Millionaire's Slice
Why so many names! Whatever you want to call these they are absolutely to die for and they are my go-to dessert whenever I'm told to bring something along to a get together.
The slice always gets rave reviews, with some even going so far as to hide a few pieces before putting serving them. I get it though - they are irresistible.
Naturally it's about time the recipe made its way onto the blog.
It may not be one of the quickest recipes on the blog, but it is well worth the effort. And most of the time it takes to prepare is downtime waiting for the slice to chill in the fridge. Active kitchen time is minimal, and the three layers are prepared without a lot of fuss.
My recipe is a little different to most.
For starters, I use an Anzac biscuit base. I love the flavour it adds, it's a little more impressive and it's so easy to prepare. For those outside of Australia and NZ, I'd like it to a sweet oatmeal cookie (sans raisins).
I also like to keep my caramel on the slightly gooey side. Not so much that it's pouring out when you cut the slice, but enough that it makes you want to devour it immediately. There's nothing more attractive that gooey caramel in my opinion.
I've seen some recipes for caramel slice suggest to bake the caramel so it's hard but this just isn't my jam. It works out perfectly on the stovetop alone, then let it set in the fridge.
Top all this deliciousness with melted milk chocolate and you've got yourself a perfectly rich dessert.
Just a word of caution – this slice is highly addictive. Don't say I didn't warn you.

INGREDIENTS
Here's what you'll need to make this slice. I've added some alternative suggestions below if you're having trouble finding any of the ingredients. Full measurements are listed in the recipe card below.
- All Purpose / Plain White Flour
- Brown Sugar
- Desiccated Coconut - Also known as "Sweetened Coconut Flakes" in America. It is finely shredded coconut.
- Butter
- Rolled Oats - Also known as old fashioned oats. Unfortunately quick oats or steel cut would not work well here.
- Golden Syrup - If you can't find it, feel free to substitute for corn syrup, honey or maple syrup.
- Sweetened Condensed Milk - Choose a full fat name brand condensed milk here. I've tried with cheaper home brand ones and it doesn't work as well. I use this one from Nestle.
- Caster Sugar - Also known as superfine sugar or baker's sugar.
- Melting Chocolate - If you're in Australia, I recommend you get the Cadbury Melts. Not sponsored, they just melt well and taste the best. I use Milk Chocolate but you could easily use Dark Chocolate if you'd like.
- Coconut Oil
STEP BY STEP INSTRUCTIONS
THE BISCUIT LAYER
- Preheat the oven to 180C / 350F and line a 28 x 18cm / 7" x 11" tray with baking / parchment paper.
- Melt butter and golden syrup together in a small saucepan on low heat.
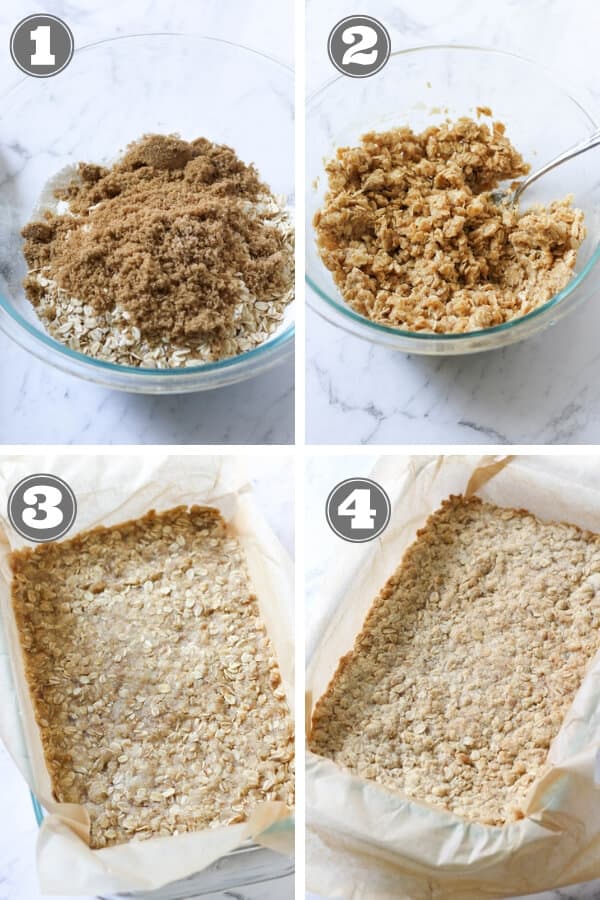
- Mix together the flour, brown sugar, desiccated coconut and rolled oats in a large mixing bowl (photo 1 below).
- Pour the melted butter mixture into the bowl and mix well (photo 2 below).
- Spoon the mixture into the tray and flatten with your hands to get an even consistency (photo 3 below).
- Bake for 15 minutes or until lightly golden (photo 4 below).
- Remove from the oven and allow to cool.
THE CARAMEL LAYER
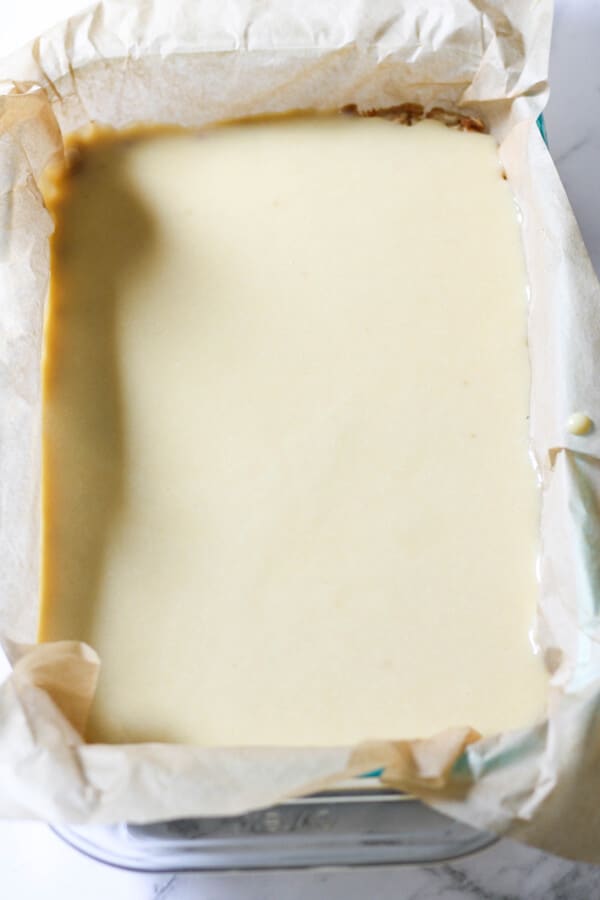
- Mix condensed milk, butter, golden syrup and caster sugar into a saucepan over low heat.
- Continuously stir / whisk the mixture until golden and thick, usually between 8 – 15 minutes.
- Pour caramel on top of your biscuit base and place in fridge to set for at least 30 minutes (as pictured below).
THE CHOCOLATE LAYER
- Fill a saucepan with a few inches of water and place on low heat.
- Set a heatproof bowl in the mouth of the pot, making sure the water doesn’t touch the bottom of the bowl.
- Add chocolate and coconut oil to the bowl and stir regularly as the chocolate softens.
- Once all is melted, remove bowl from heat and spoon mixture on top of the slice, making sure to spread it out evenly (as pictured below).
- Put the slice back into the fridge until the chocolate is set and hard (approx. 2 hours).

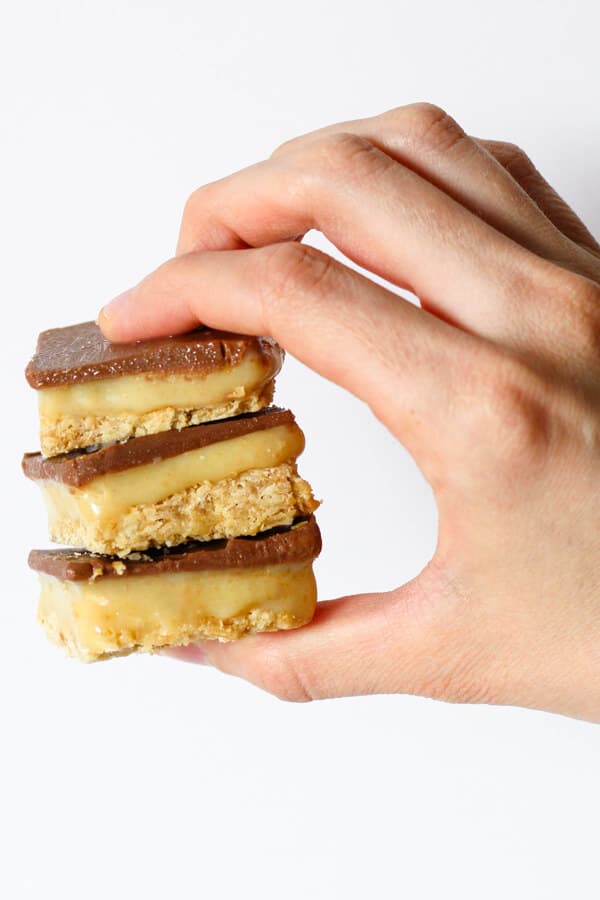
HOW TO SLICE
Chocolate topped slices are notoriously difficult to cut perfectly. I add a tablespoon of coconut oil in with the melting chocolate to help prevent it from cracking, but I also recommend taking a few more steps to ensure crack-free cutting.
First, make sure the chocolate is completely set before cutting. I recommend leaving it in the fridge for at least 2 hours, but really overnight would be best.
Then fill a bowl or jar with warm water. Dip the knife blade in the warm water, then wipe well with a tea towel before slicing. Repeat this process every time you cut another piece.
Cut the slice in squares or longer bars - it's all the same.
Note - the biscuit case will crumble a bit when you cut it. This is the nature of the beast, and the amount is negligible so not cause for concern.

STORAGE ADVICE
This slice is best kept in an airtight container in the fridge for up to a week. It won't last that long - trust me.
TOP TIPS
- Press the base firmly into your tin - use your muscles!
- Buy a brand name full fat condensed milk for your caramel. I've found generic ones don't work as well.
- Stay vigilant while cooking the caramel. You need to be regularly stirring it throughout until it turns golden and thick. It can burn easily if left unattended.
- Mix a tablespoon of coconut oil in with your melting chocolate to stop it from cracking.
- Make sure your slice is set before cutting it - chill for at least 2 hours.
- Dip your knife blade in warm water, then wipe well with a tea towel before cutting the slice. Repeat this process every time you cut another piece.
MORE DELICIOUS DESSERTS
- Anzac Slice
- Caramel Dumplings
- Mini Caramel Tarts
- Oreo Cheesecake Balls
- Chocolate Covered Almonds
- Golden Syrup Cookies
- Honey Joys (Honey Crackles)
- Flourless Orange and Almond Cakes
- Healthy Individual Apple Crisps
- OR see all Dessert Recipes
If you’ve tried this ANZAC Caramel Slice I’d love to hear how you enjoyed it! Pop a comment and a star rating below!
You can also FOLLOW ME on FACEBOOK, INSTAGRAM and PINTEREST to keep up to date with more delicious recipes.
📋 RECIPE

Anzac Caramel Slice
With a delicious soft caramel centre sandwiched between an Anzac biscuit base and rich chocolate topping, you'll find it hard to stop at just one piece of this Caramel Slice.
Ingredients
THE BISCUIT LAYER
- 1 cup All Purpose / Plain Flour, sifted
- ½ cup Brown Sugar
- ½ cup Desiccated Coconut, see note 1
- 125g / 4.5 oz Unsalted Butter, melted
- 1 cup Rolled Oats
- 1 tablespoon Golden Syrup, see note 2
THE CARAMEL LAYER
- 400g / 14 oz can Sweetened Condensed Milk
- ¼ cup Golden Syrup
- 60g / 2 oz Unsalted Butter, melted
- ½ cup Caster Sugar
THE CHOCOLATE LAYER
- 200g / 7 oz Milk Chocolate Melts / Buttons, see note 3
Instructions
THE BISCUIT LAYER
- Preheat the oven to 180C / 350F and line a 28 x 18cm / 7" x 11" tray with baking / parchment paper.
- Melt butter and golden syrup together in a small saucepan on low heat.
- Mix together the flour, brown sugar, desiccated coconut and rolled oats in a large mixing bowl.
- Pour the melted butter mixture into the bowl and mix well.
- Spoon the mixture into the tray and flatten with your hands to get an even consistency.
- Bake for 15 minutes or until lightly golden. Remove from the oven and allow to cool.
THE CARAMEL LAYER
- Mix condensed milk, butter, golden syrup and caster sugar in a saucepan over low heat.
- Continuously stir / whisk the mixture until golden and thick, between 8 – 15 minutes.
- Pour caramel on top of your biscuit base and place in fridge to set for at least 30 minutes.
THE CHOCOLATE LAYER
- Fill a saucepan with a few inches of water and place on low heat.
- Set a heatproof bowl in the mouth of the pot, making sure the water doesn’t touch the bottom of the bowl.
- Add chocolate and coconut oil to the bowl and stir regularly as the chocolate softens.
- Once all is melted, remove bowl from heat and spoon mixture on top of the slice, making sure to spread it out evenly.
- Put the slice back into the fridge until the chocolate is set and hard (approx. 2 hours).
CUTTING THE SLICE
- Once the chocolate is set, fill a bowl or jar with warm water. Dip the knife blade in the warm water, then wipe well with a tea towel before slicing. Repeat this process every time you cut another piece. Cut into bars or squares.
Notes
- Desiccated coconut is called "Sweetened Coconut Flakes" in America. It is finely shredded coconut.
- Golden syrup is a sweet syrup with a toffee-like taste. It's commonly found in Australia, NZ and the UK but if you're having trouble finding it, feel free to substitute for corn syrup, honey or maple syrup.
- I use Cadbury melts and find they work best, but feel free to substitute for any melting chocolate.
COOKING TIPS
- Press the base firmly into your tin – use your muscles!
- Buy a brand name full fat condensed milk for your caramel. I’ve found homebrand ones don’t work as well.
- Stay vigilant while cooking the caramel. You need to be regularly stirring it throughout until it turns golden and thick. It can burn easily if left unattended.
- Mix a tablespoon of coconut oil in with your melting chocolate to stop it from cracking.
- Make sure your slice is set before cutting it – chill for at least 2 hours.
- Dip your knife blade in warm water, then wipe well with a tea towel before cutting the slice. Repeat this process every time you cut another piece.
STORING
- Store slice in an airtight container in the fridge for up to a week.
NUTRITION
- No nutrition for this recipe. It's a decadent dessert. Enjoy the treat.
Mriiyn says
REcIpe states 1 Tbsp coconut oil added when melting chocola.
Cassie says
I literally just laughed at myself - forgive me but it seems I've got a case of Monday morning brain Marilyn! I didn't think about the melting chocolate! You know I've melted chocolate plenty of times without anything added to it and it works out fine, but you can also use vegetable oil 🙂
Marilyn Tolan says
I don't use coconut oil. Can I sub. w/butter or veg. Oil ?
Cassie says
Hi Marilyn, there's no coconut oil in this recipe 🙂 there's desiccated coconut or finely shredded coconut - are you able to use this?
Jodie says
Dang I'm drooling!!
XOXO
Jodie
Cassie says
Hehe - they get me every time!